Academic Course Schedulers
Academic scheduling is a complex process involving many units on campus. Decision-making begins with the academic unit. Each unit is represented by an academic scheduler, who works with faculty and administration to build and maintain course offerings. This page is designed to serve as a resource for UNC's academic schedulers.
web
Forms
view_comfy
Calendars
- Academic Term Calendars
- Final Exam Calendar
- 3-Year Calendar
- Course Scheduling Calendar
- Special Term/Short Course Deadlines
info_outline
Reference Guides
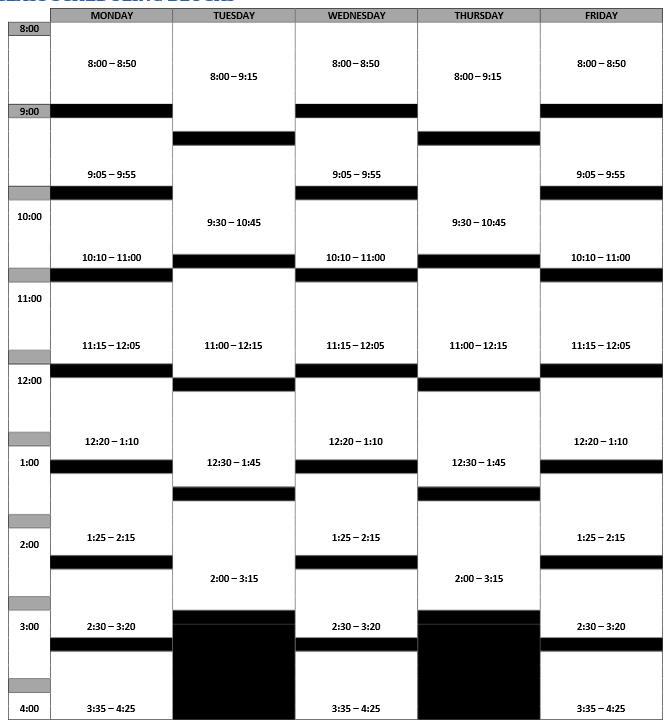
- Prime Time Scheduling Procedures
- Room Use Codes
- Common Banner Codes
- Academic Course Creation Help Sheet
Procedures/Guidelines for Academic Scheduling
Processes
- Creating a Course Section
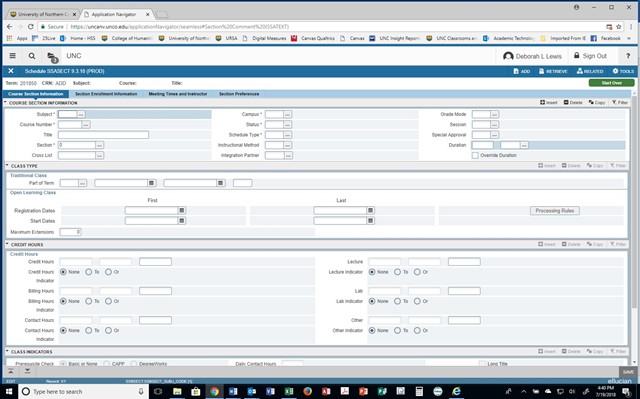
The schedule form (SSASECT) is used to build and maintain the schedule of classes according to the definitions and restrictions created in the course catalog form (SCACRSE). A course catalog record must exist prior to the creation of sections for a course.
- While in Chrome, from the URSA page click on the ‘Production Banner Admin Pages’ under
Employee Important Links to access the Banner homepage and type in SSASECT.
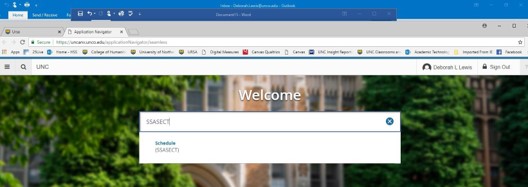
- Enter the term in the Term Field and click 'Create CRN'

- Use the following steps to enter the basic SSASECT information. Most fields have a
drop down menu that can be accessed to see available values.
- Enter the appropriate course subject in the Subject field
- Enter the appropriate Course Number, Section, Campus, Status, Schedule Type, Instructional Method, Session, Part of Term, and Credit, Billing, and Contact Hours when applicable.
- If a course is not gradable (i.e.. certain lab sections), the Gradable indicator should be un-checked.
- Save (bottom right corner) or (F10), and note that a CRN has been assigned to the section
Special Considerations
- Non-Gradable/Zero Credit Labs – for courses that are non-gradable or zero credit labs, make sure you list the zero credit hours in SSASECT under the credit hours, billing hours, lecture, and lab
- Variable Credit Courses – courses approved at the catalog level as variable credit will automatically default to variable (i.e.. 1-6). If a section needs specific credit hours, type the credit amount under credit hours, billing hours, contact hours (at the appropriate ratio), and either lecture or lab depending on the schedule type
- Variable Title Courses – courses that can be offered under different titles must have those titles submitted and approved by the department. They should not be scheduled under a new variable title until that process is complete. Information about the submission process and where to check to see if it has been approved can be found on the curriculum link on the Office of the Registrar website
- While in Chrome, from the URSA page click on the ‘Production Banner Admin Pages’ under
Employee Important Links to access the Banner homepage and type in SSASECT.
- Linking Courses
Linking courses in Banner allows sections of the same course with different schedule types (i.e.., lecture and lab) to be linked together for registration purposes. When courses are linked it requires students to register for both sections. Linking requires two different links to be applied to sections for the linking to work. If the links are not applied correctly in both places, students will be able to register without selecting both required sections at the same time.
Use the following steps to set up linked courses.
- Open the lecture course in SSASECT
- At the bottom of the screen under Class Indicators, enter the appropriate lecture Link Identifier for that section (ex. Lecture, VL) Save.

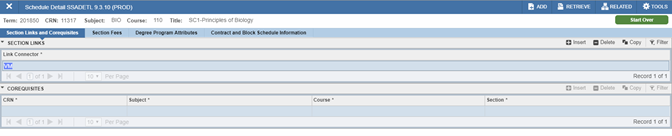
- Access SSADETL under Related and hit GO. Enter the corresponding Link Connector for the other course (ex. Lab, VM) Save.
- Open the section that is being linked to the first one and repeat the process using the appropriate linking codes, opposite of the first section. (ex. VM in first tab and VL in SSADETL)
- Multiple lecture/labs that all correspond with each other should have the same coding
placed on all lecture sections with the opposite coding on all lab sections, allowing
students to register for any lecture/lab combination. If a specific lecture section
must be taken with a specific lab section, rather than allowing students to choose,
then different codes should be used for each lecture/lab combination.
- Cross Listing
Cross listing courses in Banner allows for two or more courses to be combined for rooming purposes and for merging of Canvas shells. For example, equivalent courses under different prefixes, multiple sections of the same course, or sections that are taught by the same person at the same time and have the same course content but may be offered at different levels (i.e.. BIO 330 and BIO 530) may be cross listed. It also controls the maximum capacity between the sections if that is also needed. Use the following steps to set up cross listed courses:
Use the following steps to set up cross listed courses.
-
- Make sure all appropriate sections have been setup prior to beginning the cross listing process
- Access SSAXLST
- Create a new Cross List Group by using an approved two-character code and hit GO
- Set the Maximum Enrollment number for the entire cross list (total of all caps plus any waitlist caps).
- Perform a Next Section (ALT + Page Down) or click in the box under Cross List Section titled CRN
- Enter the CRN for the first course to be cross listed
- Click down and enter the next CRN for the second course to be cross listed (and so on)
- Verify the Enrollment Maximum for each section listed is correct. Remember if any of the section caps are increased, the maximum enrollment for the cross list needs to be increased All sections will automatically now show the cross List code on them in SSASECT.
- Save

Use the following steps to verify that the cross listed courses have the cross list identifier
- Access SSASECT.
- Enter the CRN for the first cross listed section
- You will now see that your cross list identifier is shown in the Cross List field

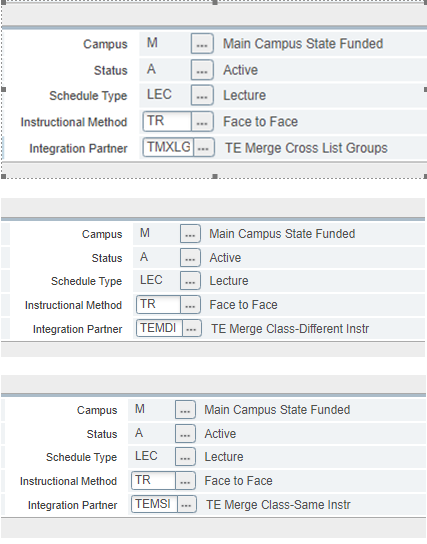
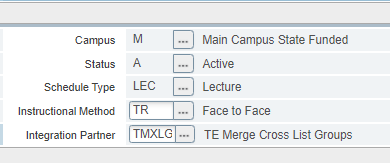
If Canvas merging is requested, enter the TMXLG Integration Partner code on all cross listed sections once cross listing coding is complete. The Canvas shell of a merged course will always take on the title and CRN of the lowest CRN value of the courses being merged. If the courses are on campus, the lowest CRN will also be the “home” course and requires the HSM or NSM auto scheduler coding, and all other sections will have the VSM or WSM coding in order to room all sections.

-
- Merging Courses in Canvas
Sections can be coded in Banner to merge into one Canvas shell via the integration partner codes TEMDI, TEMSI, and TMXLG. There are a few options for coding courses to merge, including: merging different sections of the same course, merging online and on campus courses, or merging different courses. Once the courses have been merged in Banner and rolled to Canvas, the instructor will only have to input Canvas course material once.
TMXLG - Cross-listed Courses: This code merges cross-listed courses. This code allows an instructor to merge two or more cross-listed courses into a single Canvas shell. For courses to be merged with TMXLG, they need only have the same instructor, term code, and cross-list code. See Cross Listing Courses for information on how to set up Banner coding.
TEMDI - Same Course, Different Instructor: This code merges together courses that are the same course but have different instructors. This allows instructors to merge sections of the same course when the assigned instructors are different. For courses to be merged with TEMDI, they must:
- Have the same subject code (e.g., ENG)
- Have the same course number (e.g., 120)
- Have the same part-of-term (e.g., AP)
- Have the same term code (e.g., 202230)
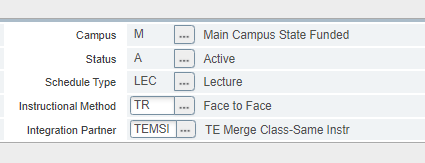
TEMSI - Same Course, Same Instructor: This code merges together courses that are the same course and have the same instructor. This allows an instructor to merge sections of the same course into a single Canvas shell. For courses to be merged with TEMSI, they must:
- Have the same subject code (e.g., ENG)
- Have the same course number (e.g., 120)
- Have the same part-of-term (e.g., AP)
- Have the same term code (e.g., 202230)
- Have the same assigned instructor
Use the following steps to set up merged classes:
- Access SSASECT.
- Enter the appropriate Integration Partner code (see below).
- Save (F10) and Roll Back (F5)
- Complete steps 1-4 for all courses being merged.
Canvas FAQs: https://www.unco.edu/canvas/frequently-asked-questions/
- Adding Section Comments
A section comment is text that will appear in the Schedule of Classes, both in URSA and the public schedule. To add a section comment, go to SSATEXT and enter the CRN or access it while in SSASECT under Related in the upper right of the Banner screen. Add the comments under Section Long Text.

Some courses require further coding added, depending on the request from the department or how a course is offered.
Course Comments:
- MF - This course meets on-campus and online. Support available at www.unco.edu/Canvas.
- Synchronous Online - This course will include virtual meetings on the days and times indicated on the schedule. Support available at www.unco.edu/Canvas.
- Asynchronous Online - Support available at www.unco.edu/Canvas.
- Creating Duplicate Sections
You can copy section information to multiple sections, reducing the amount of time spent entering course section information. All information in the section you are copying will be duplicated, including maximum enrollment. Course meeting times and instructors are not duplicated.
Use the following steps to duplicate course section information.
- Create the first section of the course on SSASECT (this will be your seed section). Leave the section number as “0”. This number can be changed after the duplication courses have been
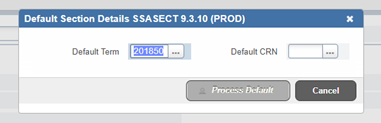
- Start Over (F5) and enter the text “ADD” in the CRN field and tab to bring up the Default Section Details window or hit Copy CRN.
- Enter the Default Term and Default CRN you want to copy from. Hint: If the Process Default button does not activate, your first (seed) section does not have the section number of “0”.
- Select the Process Default button to complete the
- You can now modify any information necessary and add meeting dates and instructor
information

- How to Enter Course Attributes
An attribute is used to identify courses that meet a specific criterion. For example, we use attributes to indicate such items as LAC’s and/or OER codes. Most attributes are coded at the catalog level, but this process would be used when a certain section was designated as something specific for the semester
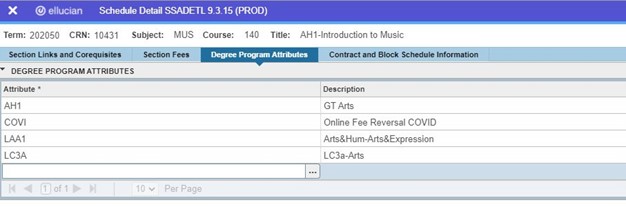
- Once the course section is created, open Banner screen Schedule Detail (SSADETL)
- Enter course term and CRN and click Go (Alt+Page Down)

- Navigate to the “Degree Program Attributes” tab (Alt+Page Down)
- Any existing Attributes on the course will be listed. These are pre-populated from
the catalog-level screen (SCADETL). To add an Attribute to the section, click Insert (F6).
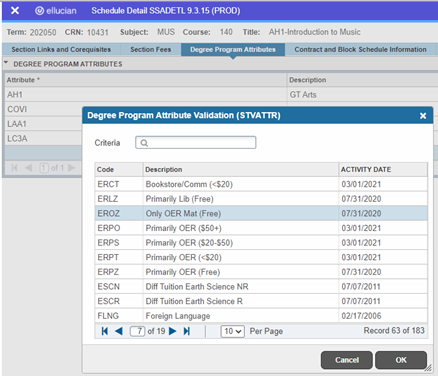
- Add the attribute code in the Attribute
- If you know the Attribute Code, you may type it in. If not, you can select the “…” button to view all attributes (also available on STVATTR).
- Select the attribute to add and click OK.
- The attribute has been added to the Click Save (F10).
- You will receive an error that states “Changing Degree Program Attributes may impact
Registration Fee Assessment.” This does not apply to all attributes, like course materials
attributes, LAC, etc. but some attributes such as Differential Tuition impact student
billing. Click OK on the warning

- If you have additional sections to edit, click Start Over (F5) to search for additional CRNs
- Setting Registration Restrictions
Registration restrictions can be placed or removed on individual course sections. These attributes work directly with the student attributes to allow or restrict registration. Most restrictions are set at the course catalog level but can be modified (if approved) at the section level.
- Once the course section is created, open Banner screen SSARRES
-
Enter the term and the CRN then click Go (Atl+Page Down)

- Choose the tab for the kind of restriction being added.

- Make sure to indicate by selecting the correct bubble of “Include” or “Exclude” for
the attribute, then add the attribute needing included or excluded.
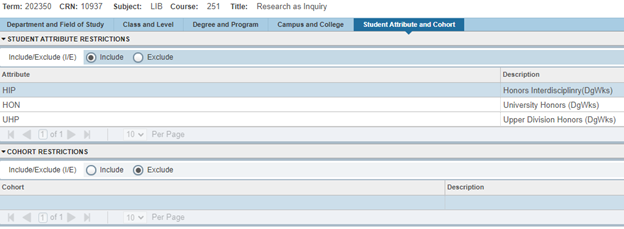
- Save Changes
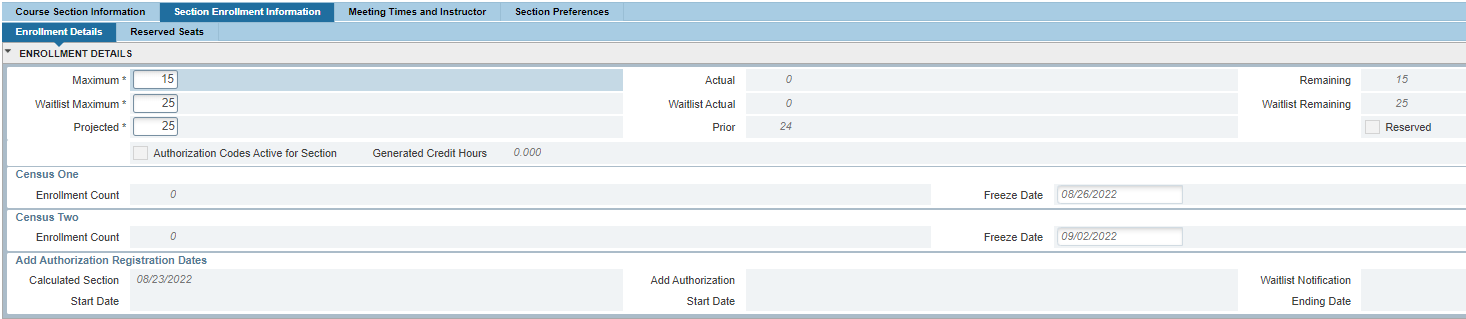
- Assigning Enrollment Information
Section capacity, waitlist and projected enrollment are all entered on the Section Enrollment Information tab on the schedule form (SSASECT). Use the following steps to enter course enrollment (capacity) information.
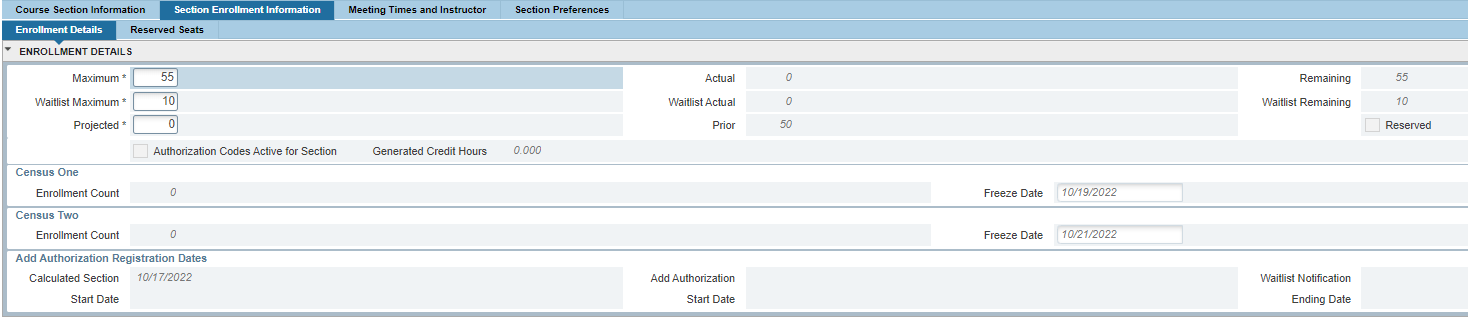
- From the SSASECT form, Course Section Information block, perform a Next Section (arrows located on lower left corner) or (ALT + Page down) or click on ‘Section Enrollment Information’ tab.
- Enter the course capacity in the Maximum field
- Save.
Banner will automatically calculate the actual and remaining seats based upon registration transactions. In addition, the Census One (add deadline) and Census Two (drop deadline) dates are automatically entered based on part of term set up and cannot be changed at the course level.
- Adding Waitlist Information
In order to allow automatic waitlist functionality for a course section, the following steps must be completed. Waitlist requirements are at the discretion of the College Dean.
- Enter the waitlist capacity in the Waitlist Maximum field
- Save (F10)
Reminder: If a waitlisted course is part of a crosslisting please adjust the total crosslist capacity to include waitlist caps.
- Adding Projected Information
Projected course information is used in the fall semesters for LAC courses when seats are held back for New Student Orientations (NSOs) to indicate the true or projected course capacity
- Enter the course’s true capacity in the Projected* field
- Save (F10)
- Assigning Meeting Time and Instructor
Section meeting type, dates, times, automatic scheduler information, and instructor are all entered on the Meeting Times and Instructor tab on the schedule form (SSASECT)
Use the following steps to enter meeting dates, times, and automatic scheduler code.
- From the SSASECT form, Section Enrollment Information screen, perform a Next Section (arrows located on lower left corner) or (ALT + Page down) or click on ‘Meeting Times and Instructor’ tab.
- In the Meeting Type field, select the appropriate meeting type code from the drop down
- ARR (Arranged) - no days or times entered
- CLAS (Class) - meets face to face with days and times indicated
- OL (Online) - may or may not have set days and times indicated
- Tab, which will automatically populate the course start and end dates based upon the part of term set
- Check the boxes that correspond with the days that the section will meet
- Enter the Start Time and End Time in military time
- Tab, which will take you to the Automatic Scheduler Select the appropriate automatic scheduler code from the drop down menu. Please note that after the room run occurs, the auto scheduler codes are not necessary unless crosslisting exists
- Save (F10)
- Please note that prior to the auto-25Live room assignments, rooms may only be pre-assigned for ADA or pedagogical justification
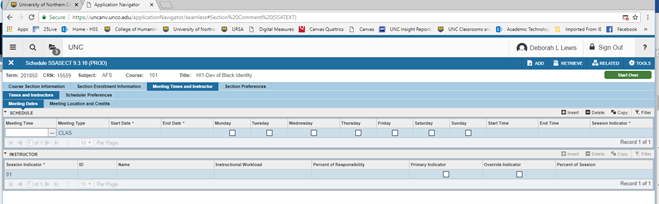
Use the following steps to assign an instructor.
- From the SSASECT form, click on the Meeting Times and Instructor
- Perform a Next Section (ALT+ Page Down)
- Enter the instructor bear number in the ID field. Enter Percent of Responsibility and select the Primary Indicator for the primary instructor of the course. Multiple instructors can be assigned to a course, but only one can be indicated as primary.
- Save (F10)
Special Considerations
- Arranged Courses – when setting up an arranged course, the meeting type of ARR should be entered. Then enter ARR in the Building field and zero for hours per week. Enter any necessary course comments on SSATEXT.
- Weekend Courses – when setting up a weekend course, be sure to enter each day the course meets to avoid time conflicts with students’ schedules and allow for accurate reporting
- Online Courses – when setting up an online asynchronous course, be sure to enter the appropriate instructional method and session type. Also the meeting type of OL should be entered. Then enter DNR in the automatic scheduler field, and ONLINE in the building field. Course text of “UNC Online-support available at unco.edu/Canvas) should be added on SSATEXT along with any other necessary information. When setting up an online synchronous course, be sure to enter the appropriate instructional method and session type. The meeting type of OL should be entered, followed by the selection of days and times. Then enter ASM in the automatic scheduler field, ONLINE in the building field, 0000 in the room field, and 'O' in the override indicator field.
- Combined Online and In Person Courses – when setting up a course that is a combination of online and in-person be sure to enter the appropriate instructional method and session type. In the meeting type use CLAS or ARR for the in-person portion and OL for the online portion; make sure that the session indicator has different numbers. Enter the appropriate automatic scheduler code for the in-person portion and DNR (and ONLINE for building) for the asynchronous online portion or ASM, ONLINE, 0000, 'O' in the override indicator field for the synchronous online portion. Text must be entered on SSATEXT indicating necessary information including the online course comment.
- Multiple Meeting Places Courses – to enter information for a course section that needs more than one room at the same time you will need to duplicate the meeting date, time, and room for the course on an additional line with the next available session indicator. Each MMP must have a different session indicator. You will need to override the room conflicts and the instructor conflicts on the assigned instructor screen.
- Binding Courses that Need to Share a Room but Maintain Separate Canvas Shells – putting two courses in the same room will result in an 25Live error. There are only
two ways to get around this. The first way is to cross list the courses using the
information in the next section. Cross listing allows the course to room in the same
space and combine the courses in canvas. The second way is to Bind courses. In situations
where courses need to room in the same space but maintain their own canvas shells,
binding is the solution. Here are the steps to Bind courses:
- Before the Room Run, change the head count of one of the courses to total the combined head count of all the sections going to be bound. That course will have whatever coding is needed for the Room Run as described in the previous section.
- Change the status of any the other sections in that binding group to “C” Cancelled. So now there will only be one active course from that group to place.
- After the Room Run, make sure the one active course has a room assigned. Adjust the head count back to the original head count.
- Now make active the courses in the binding group that were coded as cancelled before the Room Run. Make sure the head counts combined do not exceed the head count of the assigned room.
- Email the 25Live administrator asking them to bind the courses. Please make sure to provide all the CRN’s needing to be in the binding group. Please list the CRN of the course that is already roomed first.
- Assigning Scheduler Preferences
Scheduler preferences are only entered if a course section is requesting specific room attributes. This form is not necessary if there are not any requests for room attributes. Please note that all courses will room per the partition preference in 25Live, and then will room based on the course attributes.

Use the following steps to enter room preferences.
- Access the Section Preferences
- Perform a Next Section, (ALT+ Page Down) or click on the Section Preferences tab
- Select the appropriate attribute from the Room Attribute Preferences drop down, and enter 01 in the Preference Number
- Save (F10).
Codes/Terminology
Canvas Scheduling Information
- Merging Courses for Canvas
Sections can be coded in Banner to merge into one Canvas shell via the integration partner codes TEMDI, TEMSI, and TMXLG. There are a few options for coding courses to merge, including: merging different sections of the same course, merging online and on campus courses, or merging different courses. Once the courses have been merged in Banner and rolled to Canvas, the instructor will only have to input Canvas course material once.
TMXLG - Cross-listed Courses: This code merges cross-listed courses. This code allows an instructor to merge two or more cross-listed courses into a single Canvas shell. For courses to be merged with TMXLG, they need only have the same instructor, term code, and cross-list code. See Cross Listing Courses for information on how to set up Banner coding.
TEMDI - Same Course, Different Instructor: This code merges together courses that are the same course but have different instructors. This allows instructors to merge sections of the same course when the assigned instructors are different. For courses to be merged with TEMDI, they must:
- Have the same subject code (e.g., ENG)
- Have the same course number (e.g., 120)
- Have the same part-of-term (e.g., AP)
- Have the same term code (e.g., 202230)
TEMSI - Same Course, Same Instructor: This code merges together courses that are the same course and have the same instructor. This allows an instructor to merge sections of the same course into a single Canvas shell. For courses to be merged with TEMSI, they must:
- Have the same subject code (e.g., ENG)
- Have the same course number (e.g., 120)
- Have the same part-of-term (e.g., AP)
- Have the same term code (e.g., 202230)
- Have the same assigned instructor
Use the following steps to set up merged classes.

- Access SSASECT.
- Select the Integration Partner drop down
- Choose the appropriate Canvas Integration Partner code (see Cross Listing and Linking Courses for approved codes).
- Save (F10) and Roll Back (F5)
- Complete steps 1-4 for all courses being merged.

- Canvas Access for Non-Registered Individuals
- The ‘Canvas Access for Non-Registered Individuals’ form will be sent to the appropriate Course Scheduler based on what college the requester selects, e.g. HSS, PVA, etc.
- The Scheduler is responsible to make sure that person being added meets the LMS Policy, UNCOA-004Learning Management System
- The Scheduler will log into Canvas using their lastname@unco.edu and password
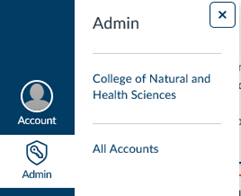
- Click on ‘Admin’ followed by the college name
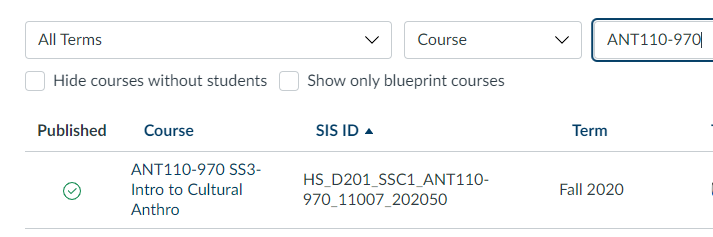
- Search for a course by selecting the term under “All Terms” and enter the course or CRN in the “Search courses”
- NOTE: When entering the course there is no space between the subject and course number
and a dash (-) between the course number and section, g. ANT110-970.
- Once the course for the correct term has been found, click the + sign at the right
of the screen

- Make sure the ‘Email Address’ is marked and enter the person’s UNC email in the box.
Select the correct “Role” from the dropdown and click “Next” in the lower right.
Click ‘Add Users’ on the next screen - The User should now appear in the list of people in the course
Editing Added Users
- To change the role, open the course shell and click on ‘People’.
- Find the name of the user you want to edit. Then click on the 3 horizontal dots after the name and click ‘Edit Role'
- Click ‘Edit Role’, choose the correct Role from the dropdown and click Update
- To delete a user added by mistake, click on the 3 horizontal dots after their name, select ‘Remove from Course’ on the drop down Click ‘OK’ on the next pop-up screen.
Instructor request form to add/change/remove someone from Canvas: https://unco.co1.qualtrics.com/jfe/form/SV_29RI2eAsravn6nz